
The journey to Mars is approximately 480 million kilometers long and takes seven to eight months to complete. This raises a multitude of challenges, one of which is the provisioning of food for the crew. If we cannot carry sufficient supplies with us, is it possible to grow plants in space? How do plants develop in a microgravity environment? This is what we will examine here.
NASA already outlined its plans for a mission to Mars in 2015. In the first phase, technologies required for deep‑space exploration, as well as the effects of prolonged spaceflight on the human body, are studied in low Earth orbit aboard the International Space Station (ISS). In the second phase, a permanent base would be established on the Moon, where the conditions for long‑term habitation in deep space and on other celestial bodies could be investigated. In the third phase, extended lunar missions independent of terrestrial life would take place, during which astronauts would learn how to live on an alien world using locally available materials. Only after this could a human mission to Mars be attempted.
There are, of course, skeptics. While Joe Biden has allocated billions of dollars to NASA for the Artemis program, and Elon Musk envisions the “colonization of Mars” as early as 2030, Britain’s Astronomer Royal Martin Rees argues that such crewed space missions are entirely unnecessary. According to him, space research tasks can now be carried out more cheaply, simply, and efficiently by robots. Human spaceflight, Rees suggests, should be left to those who are willing to spend their own money on such adventures and accept the associated risks; public funds should not be spent on them.
Space Gardening
If humans intend to live on the Moon or colonize Mars, food production must also be solved. Today, the duration of nuclear submarine missions is limited by the amount of food that can be stored on board, while drinking water and oxygen can be produced locally. On a submarine, space is the primary constraint; on a spacecraft, however, mass is the greatest challenge. The cost of launching objects into space is literally measured in gold: sending something into orbit has cost almost as much as its own weight in pure gold.
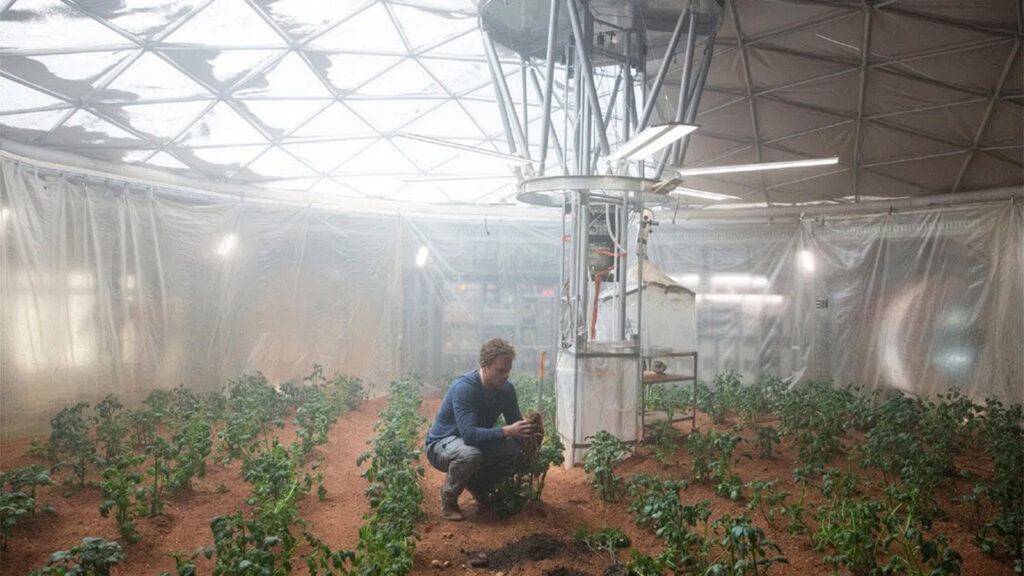
Instead of transporting food from Earth to the Moon or Mars, it would be far more economical and rational to produce it locally. Plants must be grown—potatoes, for example. But in what medium? Either in hydroponic systems or in compost made from astronauts’ waste, as Mark Watney, the stranded astronaut in Andy Weir’s novel The Martian, does on Mars. Incidentally, it is a very well‑written novel and well worth reading.
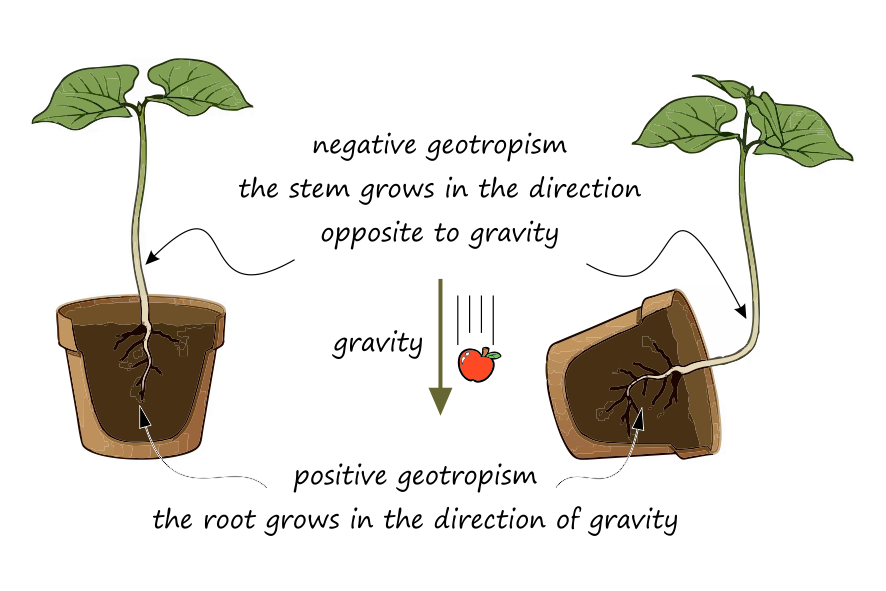
One of the main problems with a space garden is the lack of gravity—or its very low value. In space it is effectively zero; on the Moon it is one‑sixth of Earth’s gravity, and on Mars slightly more than one‑third. Terrestrial plants rely on gravitropism (also known as geotropism) during their growth. Gravity helps them determine which direction is up and which is down, and where to grow roots and shoots.
Specialized cells called statocytes sense the direction of gravity. These cells are found in the root tip and in the inner cortical layer (endodermis) of the stem. Statocytes contain starch‑filled bodies called statoliths, which settle at the bottom of the cell under the influence of gravity. The physical stimulus is converted by the statocytes into biochemical signals through the production of a growth hormone, auxin. This signals other cells in the plant where to grow.
In roots, auxin causes cells on the upper side to grow faster than those on the lower side; the upper side elongates more rapidly, and the root bends downward (positive gravitropism). In stems, the same mechanism applies, except that auxin accumulates on the lower side, causing the stem to bend upward (negative gravitropism).
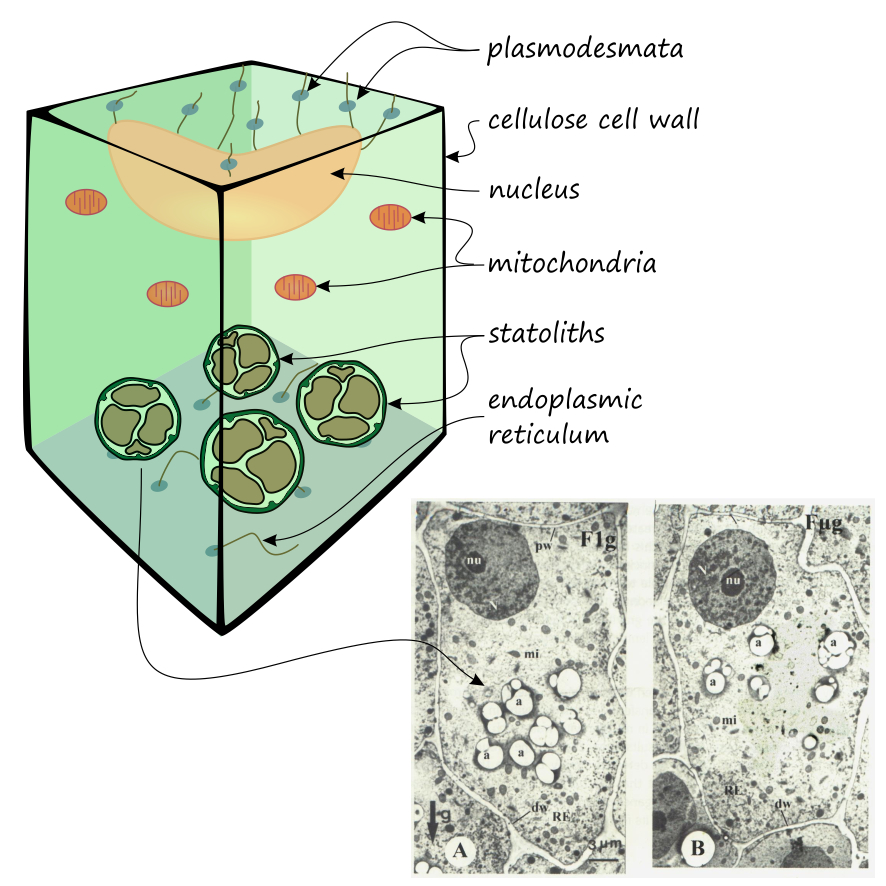
An excellent article on this topic was published in the January 2013 issue of the American Journal of Botany (https://doi.org/10.3732/ajb.1200315), although many details of the mechanism are still not fully understood. For example, gravitropic responses have also been observed in Arabidopsis mutants lacking statoliths, which is thought to be due to the weight of the entire protoplast.
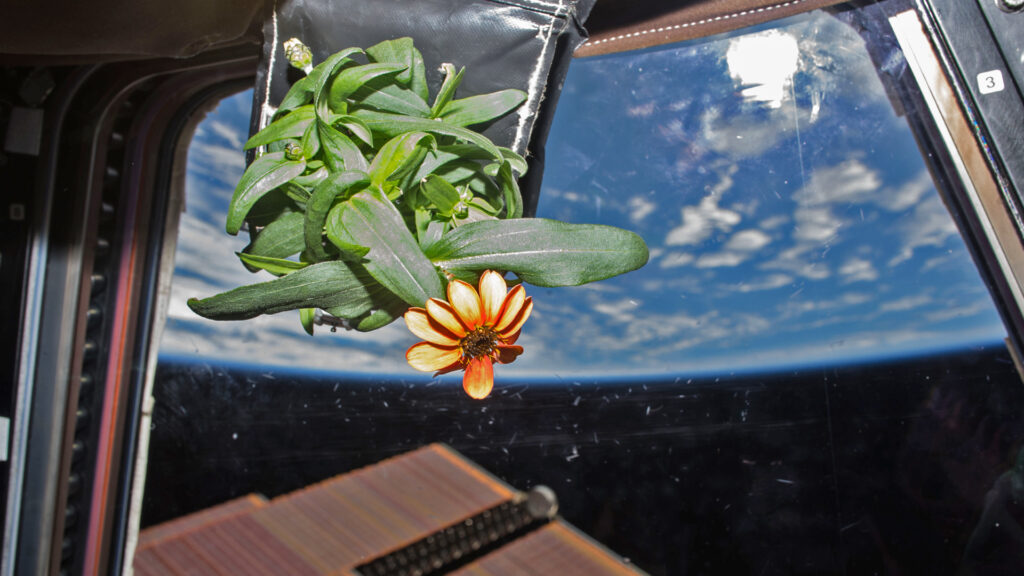
NASA conducts costly experiments aboard the International Space Station to understand how plants behave in a microgravity environment. More information can be found, for example, on NASA’s website: https://www.nasa.gov/content/growing-plants-in-space. The task is far from simple, and space‑gardening astronauts face numerous challenges. Some plants have dried out because they could not absorb enough water; others showed guttation (excess water uptake causing the plant to “weep” from its leaves due to internal overpressure); still others were destroyed by mold.
Questions remain: are plants grown in space more susceptible to disease? Can the functioning of their genes change? What happens to the microbes living alongside them? As a Seeker video demonstrates, gardening without gravity is a complex undertaking (https://youtu.be/9Vh4__TY78A). NASA’s pages provide extensive reading on the subject—but for now, let us stay on Earth and build a clinostat.
The Clinostat
A clinostat is a microgravity simulation device based on averaging the gravity vector. It was invented in 1879 by the German botanist Julius von Sachs. The earliest versions were single‑axis, or 2D, clinostats. These are easy to build: essentially, one only needs to rotate the container holding the samples around a horizontal axis using a motor.
The rotation confuses the statocytes, because before the statoliths can settle on one side, the machine turns the plant. If the statoliths do not have time to settle at the bottom of the cells, the plant cannot determine where up and down are. Of course, it can still rely on other cues, such as phototropism (growth response to light direction), but that is another story.
Gravity is still present—we cannot switch it off—but if the rotation is fast enough, the plant can only perceive the average of the gravitational force, which, in the case of rotation around a horizontal axis, is close to zero.
The rotation speed must not be too high either, because then the plant will sense centrifugal force instead, which effectively replaces gravity. It has been observed that especially for larger plants, 2D clinostats do not perfectly simulate weightlessness. Better simulation can be achieved with random 3D rotation. At the end of the 20th century, 3D clinostats—also known as RPMs (random positioning machines)—were developed (https://youtu.be/9EciE4hhMbg).
Building such a device is cumbersome, and coordinating the rotation of two axes so that the average gravity truly approaches zero is not trivial. A 2D clinostat, by contrast, is easy to assemble: it requires only a stand and a slowly rotating motor. Even a motorized screwdriver can suffice if it is slow enough, perhaps with the trigger taped down. It can even be built from LEGO bricks. The rotation speed should be approximately 0.5–5 revolutions per minute—no more.
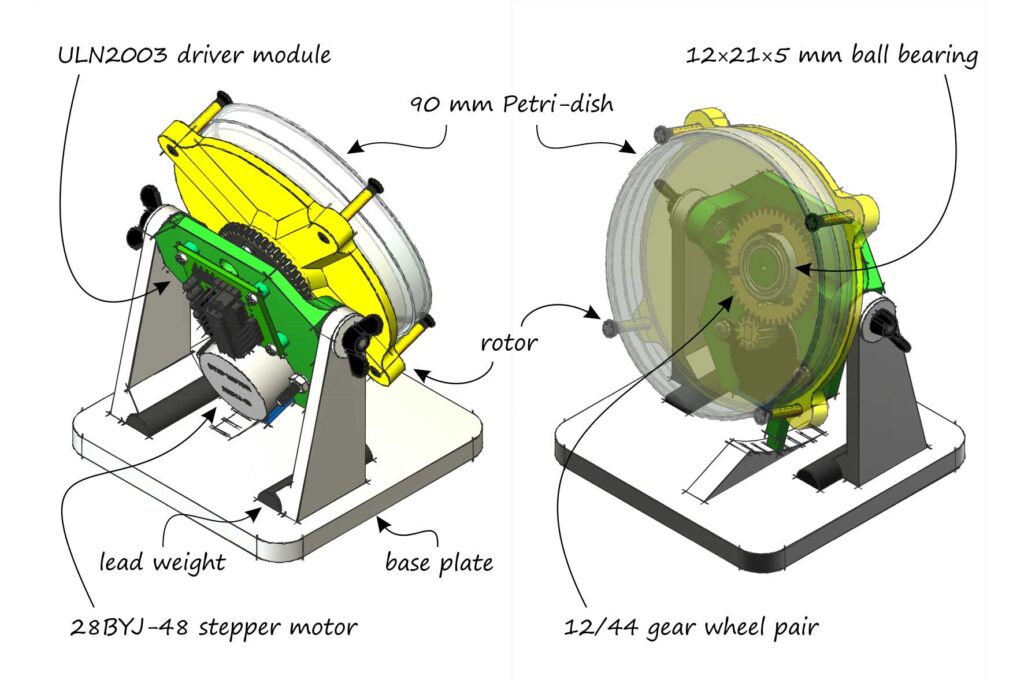
The tiltable, 3D‑printable structure shown in the illustration is driven by an SM‑28BYJ‑48‑5V stepper motor. This is one of the cheapest and most suitable options for this purpose, and it can be controlled with an Arduino via a ULN2003 stepper‑motor driver module. A stepper motor rotates its shaft in discrete steps, turning by a fixed angle with each step. It is popular in robotics because, although somewhat slow, it allows precise positioning and is easy to control digitally.
There are countless tutorials online on how to use such components; one example can be found in this video: https://youtu.be/avrdDZD7qEQ. A DHT11 temperature and humidity sensor and a BH1750 light sensor can also be connected to the Arduino, allowing environmental parameters to be recorded. It is even possible to build a heated clinostat; for a starting point, see for example: https://github.com/aln0071/Incubator.
Cress Cultivation
Many different cultures can be tested in a clinostat, but for beginners the best choice is garden cress (Lepidium sativum), also known as peppergrass. It is a popular salad plant, but is also used in soups and teas. It grows very quickly: within 24 hours it develops a 1‑cm root, and after 36 hours shoots appear. Seeds for sprouting can be purchased in organic food stores.
In the clinostat, the cress is grown on agar medium. Agar‑agar can also be found in organic shops; it is a gelling agent derived from algae, used in vegan cooking as a substitute for gelatin, and in laboratories to prepare bacterial culture media, for example when mixed with meat broth or sheep’s blood. Here, we use it in pure form.
Mix one packet of agar powder (2 grams) thoroughly with 150 ml of lukewarm tap water until lump‑free; this yields enough solution for about five to six containers. While stirring continuously, bring the solution to a gentle boil until it becomes completely clear (5–10 minutes). Then wait about five minutes for it to cool, and pour it into Petri dishes so that they are about half full (the liquid layer should be approximately 4–5 mm thick). Cover the dishes and wait for an hour. The gel usually solidifies within half an hour, but additional time is needed for the agar plate to become stable enough to stand vertically. If condensation forms on the lid, remove it and wipe it dry with a paper towel.
While the agar is setting, print out the provided template. The hexagonal pattern provides about 3 cm of space for each seedling in a 90‑mm Petri dish, but scaled down it can also be used for 60‑mm dishes. Cut out the templates and tape them to the bottom of the dishes.
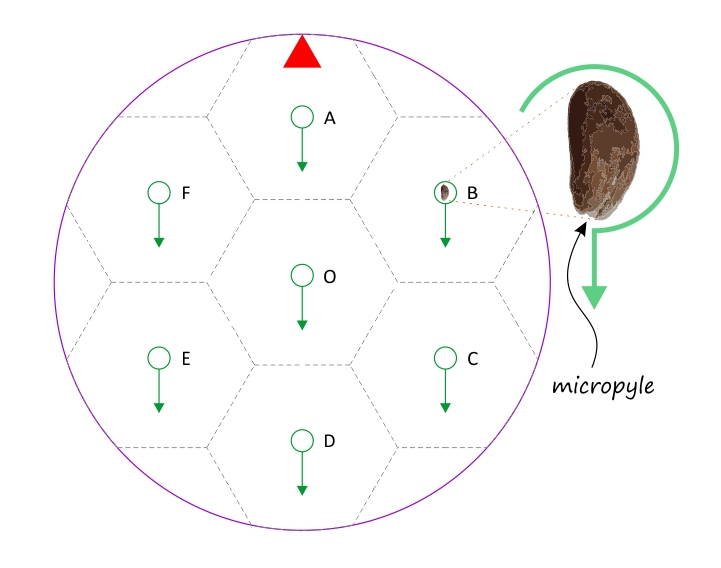
Using tweezers, place seven cress seeds individually onto the agar, positioning each in the center of the green circles. If you examine a cress seed under a magnifying glass, you will see a small notch at the pointed end. This is the micropyle, or germination pore. Place the seeds so that the micropyle always faces the direction indicated by the green arrows. Gently press the seeds into the agar just enough to ensure they adhere to the surface and can still access air.
Wait ten minutes for the seed coats to absorb some moisture and adhere properly. Then try standing the Petri dish upright. If any seed falls off, reposition it and wait a little longer. Cover the dish and secure the lid with transparent tape. Use only three strips of tape at 120‑degree intervals; do not tape all the way around. Place small cardboard spacers underneath so the seedlings can receive air. The experiment can now begin.
Secure one Petri dish to the clinostat using a rubber band or tape and start the rotation. Place two additional Petri dishes next to the clinostat (for example, attached to a wooden block) with the red arrows pointing upward. Place the entire setup in a dark location so that light does not influence germination. Check the seedlings every one to two hours and photograph them each time. It is fine to stop the machine briefly for photography. Once the cress seedlings have developed roots about a centimeter long, rotate one of the two stationary Petri dishes by 90 degrees.
After approximately 48 hours, the experiment can be concluded. Count how many seeds have germinated and, based on the photographs, determine when this occurred. Measure the root lengths. Did the seedlings in the clinostat develop more slowly or more quickly? How did gravity affect root orientation? How do the directions of shoots and roots compare?
Further experiments can then be conducted. The effect of light (phototropism) can be tested by placing a lamp in front of or above the Petri dishes, or by placing the entire setup on a windowsill. One can also investigate the effect of partial gravity.
Earth’s gravitational acceleration is approximately g ≈ 9.81 m/s²; on the Moon it is 1.63 m/s², and on Mars 3.71 m/s². In a rotating clinostat, the average gravitational acceleration is given by g′ = g · cos(θ), where θ is the angle between the clinostat’s axis and the vertical. Tilting the machine about 10 degrees from horizontal yields lunar gravity; at 22 degrees, Martian gravity. What effects do these conditions have?
If the tilt angle is changed during the experiment, one can also observe how quickly the seedlings respond. Interestingly, while average gravity is proportional to cos(θ), the speed of the geotropic response is proportional to sin(θ). By stopping the clinostat periodically in a fixed position for 15–300 seconds, it is even possible to determine the minimum time required for cress to respond to gravity.
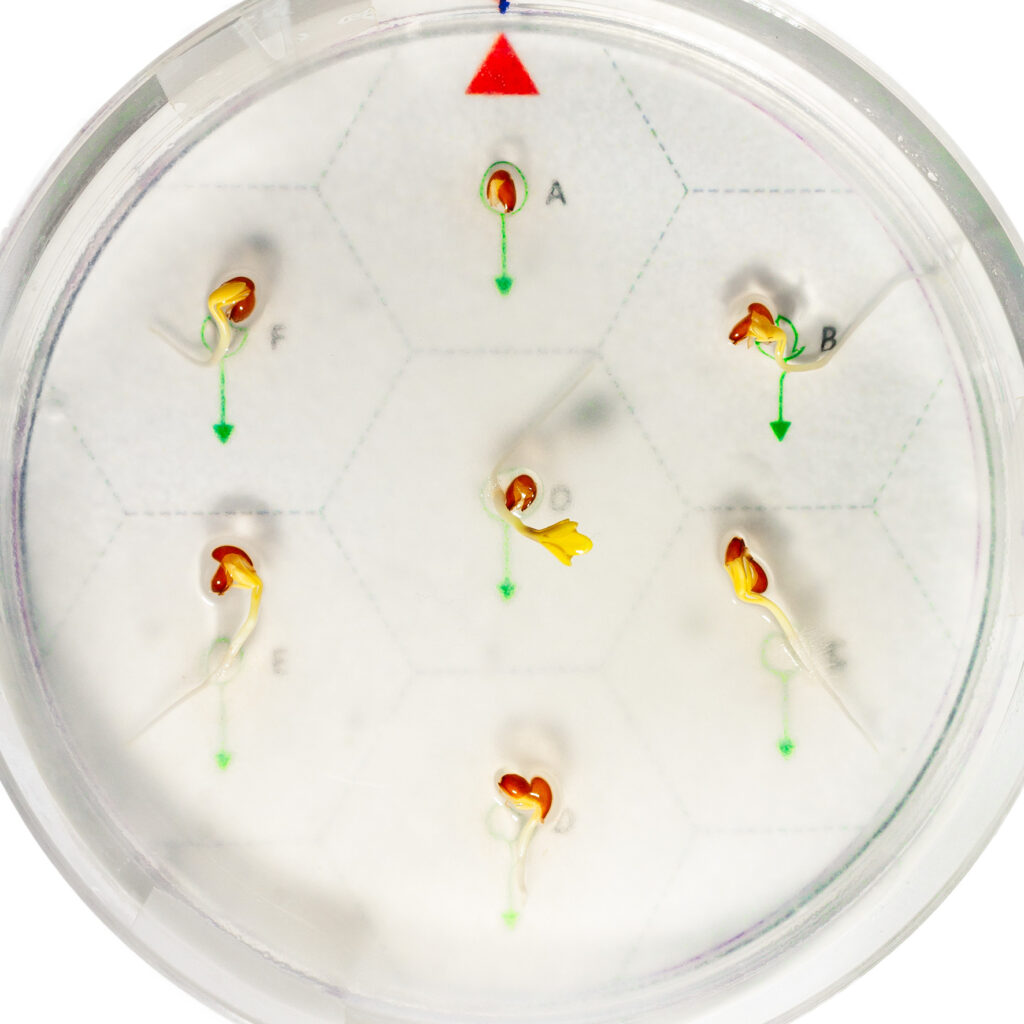
The machine is capable of higher rotation speeds, the effects of centrifugal force can also be observed. The accompanying image was taken 48 hours after planting at a rotation speed of 20 rpm. The seed labeled O at the center initially experienced no gravity. Although not visible in the image, its root was initially coiled, then suddenly began growing radially outward. For the seeds on the outer circle at a radius of about 3 cm (labeled A–F), the effect of centrifugal force on root orientation is clearly visible. This force is approximately one‑eightieth of Earth’s gravity and points radially outward.
Interestingly, the seed labeled A, which was planted “upside down” relative to the force direction, lagged significantly in development. Even after being removed from the clinostat, it continued to grow more slowly. Seeds B and F also lagged slightly, while the centrally located seed O showed the fastest growth, surpassing even the well‑developing C–E seedlings.
There is much to experiment with, but even so, plenty of cress seeds will remain. If you wish to grow salad from the leftovers, you can sow them as described by Bálint Gazda (https://balintgazda.hu/minden-heten-szuret/januar/kerti-zsazsa.html), but it is simpler to spread the seeds on the grid of a sprouting tray. Only a small amount is needed, as the seeds will swell to several times their original size.
Cress does not need to be soaked like other seeds, because it becomes gelatinous and germination then stops. Simply mist it lightly with a spray bottle twice a day. In the sprouting tray, the water level should be 4–5 mm below the grid—deep enough for the roots to reach, but not so high that the seeds are submerged. Cress prefers warmth and grows best at 20–22 °C. Keep it in the dark for the first two to three days, then move it to a sunny location once leaves begin to appear. After five to six days, the crop can be harvested with scissors. The remaining stems will not regrow and should be discarded.
Cress is eaten raw, in salads, as a sandwich garnish, or alongside steamed meats and vegetables. Personally, I like it best sprinkled on buttered bread. At first it tastes slightly bitter, then develops a mildly pungent, “spring‑like” flavor. And while munching on it, one might wonder: on Mars, would buttered bread always land butter‑side down?